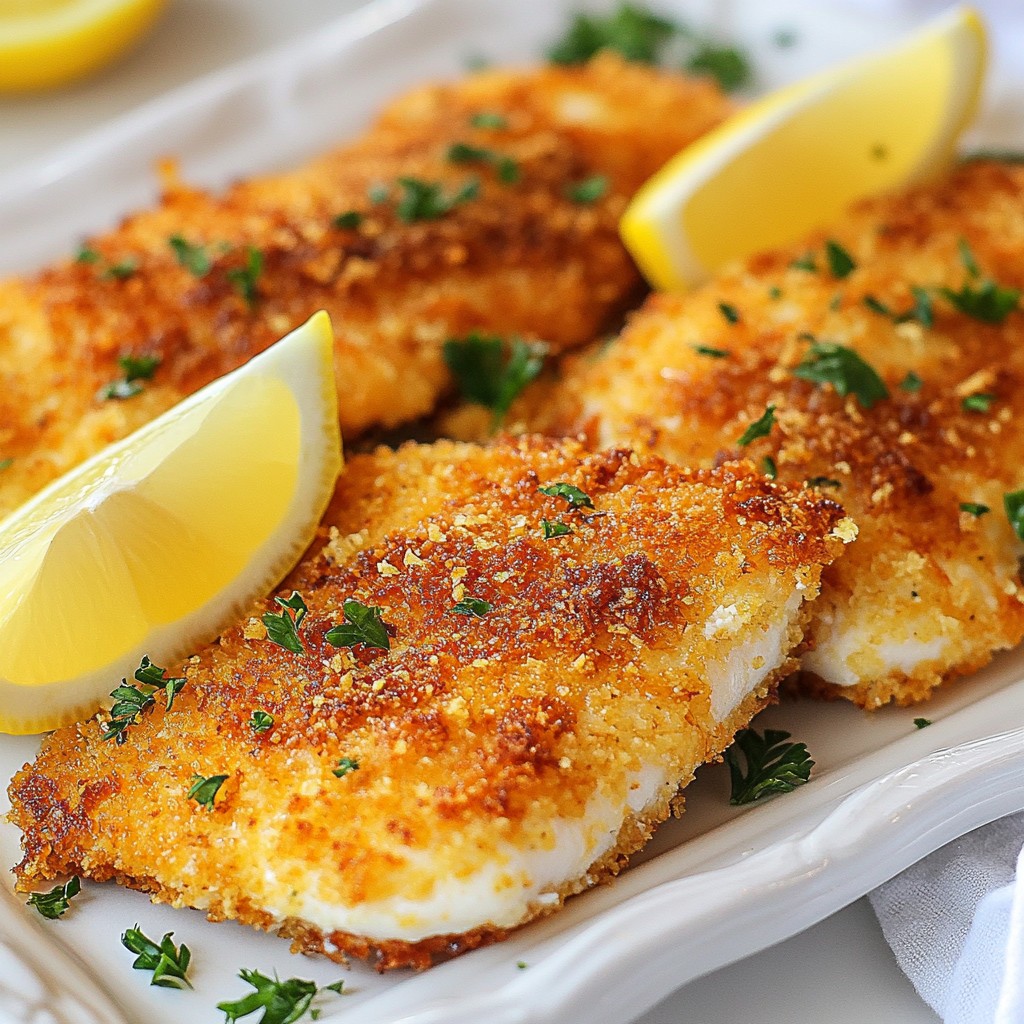
Are you struggling to please a picky eater at your dinner table? Look no further! My Crispy Picky Eater Parmesan Crusted Tilapia Delight is here to save the day. With its crunchy, cheesy coating and tender fish inside, this dish is a guaranteed hit. It's simple to prepare and sure to impress even the most discerning taste buds. Join me as I guide you through this easy and delicious recipe!
Why I Love This Recipe
- Crispy Texture: The panko breadcrumbs create a delightful crunch that even the pickiest eaters will love.
- Quick Preparation: This recipe is easy to prepare, making it perfect for busy weeknights.
- Flavorful Coating: The combination of Parmesan cheese and Italian herbs adds a burst of flavor without overpowering the fish.
- Versatile Pairings: This tilapia pairs beautifully with a variety of sides, from salads to roasted vegetables.
Ingredients
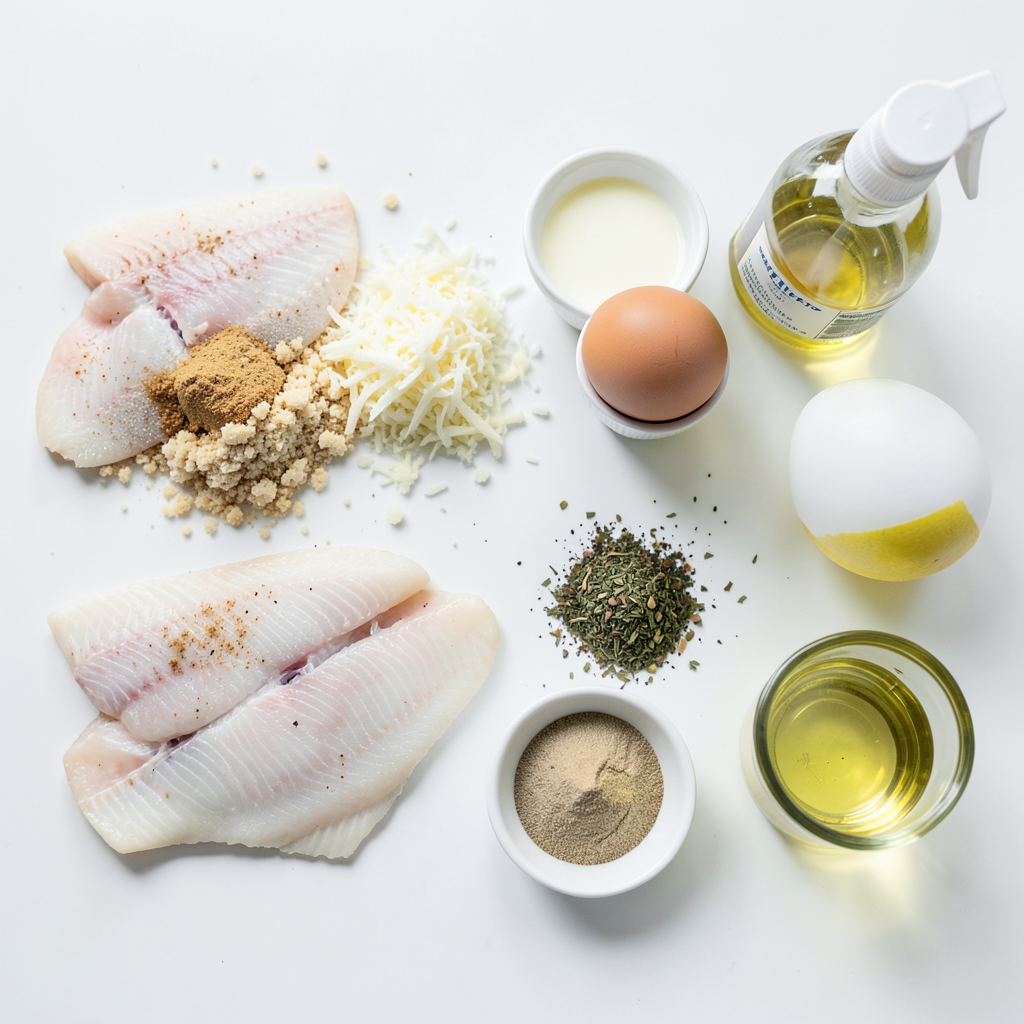
Here’s what you need to make crispy picky eater Parmesan crusted tilapia. Gather these simple ingredients:
- 4 tilapia fillets
- 1 cup panko breadcrumbs
- 1/2 cup freshly grated Parmesan cheese
- 1 teaspoon garlic powder
- 1 teaspoon onion powder
- 1 teaspoon dried Italian herbs
- 1/2 teaspoon sea salt
- 1/4 teaspoon freshly ground black pepper
- 2 large eggs
- 2 tablespoons milk
- 1 tablespoon fresh lemon juice
- Olive oil spray or 2 tablespoons melted butter
These ingredients combine to create a tasty and crunchy coating. Each one adds flavor. The panko gives a light crunch, while the Parmesan adds a rich, cheesy taste. The spices, like garlic and onion powder, bring out the fish's natural flavor. By using fresh lemon juice, you brighten the whole dish. The eggs and milk help the coating stick to the tilapia, making each bite delicious.
You can find most of these ingredients at your local grocery store. If you want to swap or add ingredients, feel free! Make this recipe your own and enjoy the cooking process.
Step-by-Step Instructions
Preparation Steps
1. Preheat your oven to 425°F (220°C). This helps cook the fish evenly. Line a baking sheet with parchment paper. This step helps prevent sticking and makes cleanup easier.
2. In a shallow dish, mix the panko breadcrumbs, Parmesan cheese, garlic powder, onion powder, dried Italian herbs, sea salt, and black pepper. Blend them well for even seasoning.
3. In another shallow bowl, whisk together the eggs, milk, and lemon juice. Mix until you see bubbles. This mixture helps the coating stick to the tilapia.
Coating the Tilapia
1. Pat the tilapia fillets dry using paper towels. Dry fish ensures the coating sticks better.
2. Dip each fillet into the egg mixture. Let any extra egg drip off. Then, coat the fish in the breadcrumb mix. Press down gently so the crumbs stick well.
Baking the Tilapia
1. Arrange the coated tilapia fillets on the prepared baking sheet. Make sure they are in a single layer for even cooking.
2. If using melted butter, drizzle it over the fillets. If using olive oil spray, give the tops a quick spray. This adds flavor and crispness.
3. Bake the fillets in the oven for 12-15 minutes. The fish is done when it is fully cooked and the coating is golden brown and crispy.
4. For even crispiness, flip the fillets halfway through the baking time. This helps both sides get that nice crunch.
5. Once cooked, take the baking sheet out of the oven. Let the fillets sit for a couple of minutes. This step makes the fish juicier when you serve it.
Tips & Tricks
Perfecting Crispiness
To get that perfect crispy bite, start by drying the tilapia fillets. Water on the fish will make it hard for the coating to stick. Use paper towels to pat each fillet dry on both sides. This small step makes a huge difference.
Next, choose the right oil or butter. I recommend using olive oil spray or melted butter. Both options help the breadcrumbs crisp up nicely. Just drizzle the melted butter or spray the oil over the fillets before baking.
Flipping the fish halfway through cooking is key for even crispiness. This ensures both sides get that golden brown look and crunchy texture. Keep an eye on the fish to check if it is ready after 12 minutes.
Serving Suggestions
When hosting, presentation matters. Arrange the tilapia on a large platter. Add fresh lemon wedges on the side. A sprinkle of chopped parsley adds color and freshness. This simple touch makes your dish look gourmet.
For picky eaters, pair the tilapia with sides they love. Steamed vegetables or a light salad work well. You can also serve it with rice or mashed potatoes. These options keep the meal balanced and delicious.
Storage and Reheating
For leftover tilapia, store it in an airtight container. Keep it in the fridge for up to three days. Make sure it cools down first before sealing.
Reheating is easy. To keep it crispy, use the oven. Preheat it to 350°F (175°C) and bake for 10 minutes. This method helps the coating stay crunchy. Avoid using the microwave, as it makes the fish soggy.
Pro Tips
- Dry the Fish: Pat the tilapia fillets dry with paper towels before coating. This step ensures the breadcrumb mixture adheres better, resulting in a crispier finish.
- Use Fresh Ingredients: Whenever possible, use freshly grated Parmesan cheese instead of pre-packaged. Fresh cheese melts and browns better, enhancing the flavor and texture.
- Experiment with Spices: Feel free to customize the seasoning blend by adding a pinch of cayenne pepper for heat or some smoked paprika for a different flavor profile.
- Check for Doneness: Use a fork to check if the tilapia flakes easily when done. This indicates that it is cooked through and ready to serve.
Variations
Flavor Enhancements
You can make this dish even tastier. Adding spices or hot sauce can give it a kick. Try paprika for a smoky flavor or cayenne for heat. You can also switch up the herbs. Use fresh dill or cilantro for a different taste. This way, you can cater to what you like best.
Alternative Fish Options
Not a fan of tilapia? No problem! You can use other fish like cod or haddock. Each type of fish has its own flavor and texture. If you switch fish, you may need to adjust the cooking time. Thicker fish fillets may need a few extra minutes in the oven. Always check for that golden brown color to know when it's done.
Gluten-Free Modifications
If you need a gluten-free option, there are great choices. Look for gluten-free breadcrumbs made from rice or corn. They work well and keep the same crunch. You can also use crushed nuts for a fun twist. Just make sure to check the labels for gluten content. This way, you keep the crispiness and flavor without any worries.
Storage Info
How to Store Leftovers
To keep leftover tilapia fresh, store it in the fridge. First, let the fish cool to room temperature. Then, place it in an airtight container. You can also wrap it tightly in plastic wrap. This helps prevent the fish from drying out.
Freezing Recommendations
If you want to freeze tilapia, make sure it is fully cooled. Wrap each fillet in plastic wrap. Then, place the wrapped fish in a freezer-safe bag. This prevents freezer burn and keeps it fresh. When you want to cook it, thaw the tilapia in the fridge overnight. This method keeps the texture nice.
Duration for Storing
Cooked tilapia can last in the fridge for about 3 days. If you freeze it, it can last for up to 6 months. Make sure to label the containers with the date. This helps you keep track of how long the fish has been stored.
FAQs
Can I use frozen tilapia?
Yes, you can use frozen tilapia. It’s good to thaw it first for best results. Place the frozen fillets in the fridge overnight to thaw. If you're short on time, you can run them under cold water for about 30 minutes. After thawing, pat the fillets dry. This helps the coating stick better.
How do I know when tilapia is cooked?
Tilapia is done when it flakes easily with a fork. The flesh should be opaque and white. Another sign is that the internal temperature reaches 145°F (63°C). If the fillet looks golden and crispy on the outside, it is likely cooked through.
What to serve with Parmesan Crusted Tilapia?
You can serve this tilapia with many tasty sides. Here are some great options:
- Steamed broccoli or green beans
- A fresh mixed salad with lemon vinaigrette
- Creamy mashed potatoes or rice
- Quinoa for a healthy twist
These sides balance the dish and help picky eaters enjoy their meal.
Can this recipe be made ahead of time?
Yes, you can prep this dish ahead of time! Coat the tilapia, then cover it and store it in the fridge for up to 24 hours. When ready to cook, just bake it as directed. This makes meal prep easier and saves time on busy days. If you want to freeze it, place the coated fillets in a single layer on a baking sheet. Once frozen, you can transfer them to a freezer bag.
You can create a tasty meal with Parmesan crusted tilapia easily. We covered all the steps, from ingredients to baking to serving. This dish is perfect for any occasion, even for picky eaters. Use the tips to get crispy fillets and neat storage. You can also try variations to keep it fresh. Enjoying this recipe will surely impress your family and friends. Don’t forget to experiment with flavors and sides that make you happy!