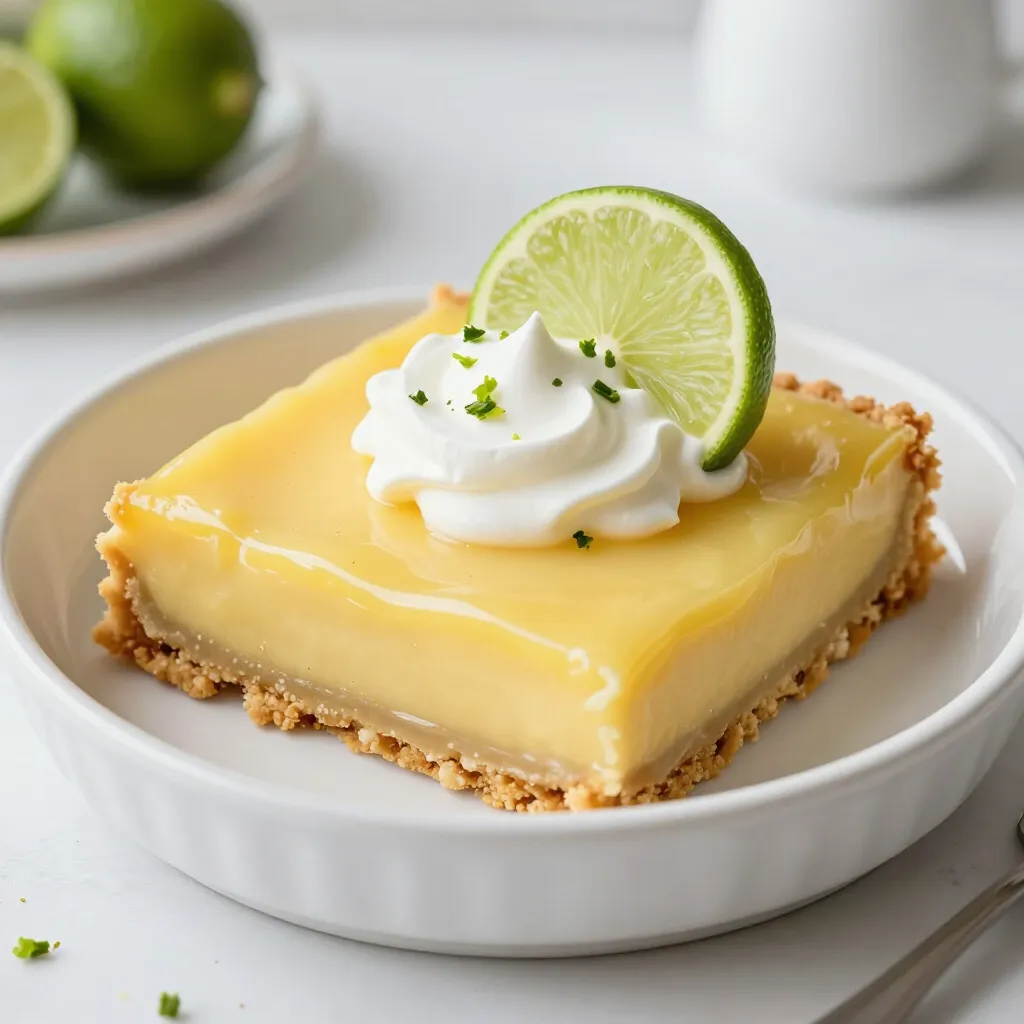
Get ready to treat your taste buds with my Key Lime Pie Bars! This delightful and easy recipe combines zesty key lime flavors with a buttery graham cracker crust. Perfect for any occasion, these bars are quick to make and sure to impress. I’ll guide you through each step, from mixing the crust to serving. Let’s dive into this fun and tasty dessert adventure that you can enjoy in no time!
Why I Love This Recipe
- Bright and Tangy Flavor: The combination of fresh key lime juice and lime zest creates a refreshing and zesty flavor that’s perfect for warm weather.
- Easy to Make: This recipe involves simple steps and common ingredients, making it accessible even for beginner bakers.
- Perfect for Sharing: These bars are easy to cut into portions, making them great for parties, potlucks, or family gatherings.
- Chill Factor: After a few hours in the fridge, these bars become perfectly firm and cool, providing a delightful treat on a hot day.
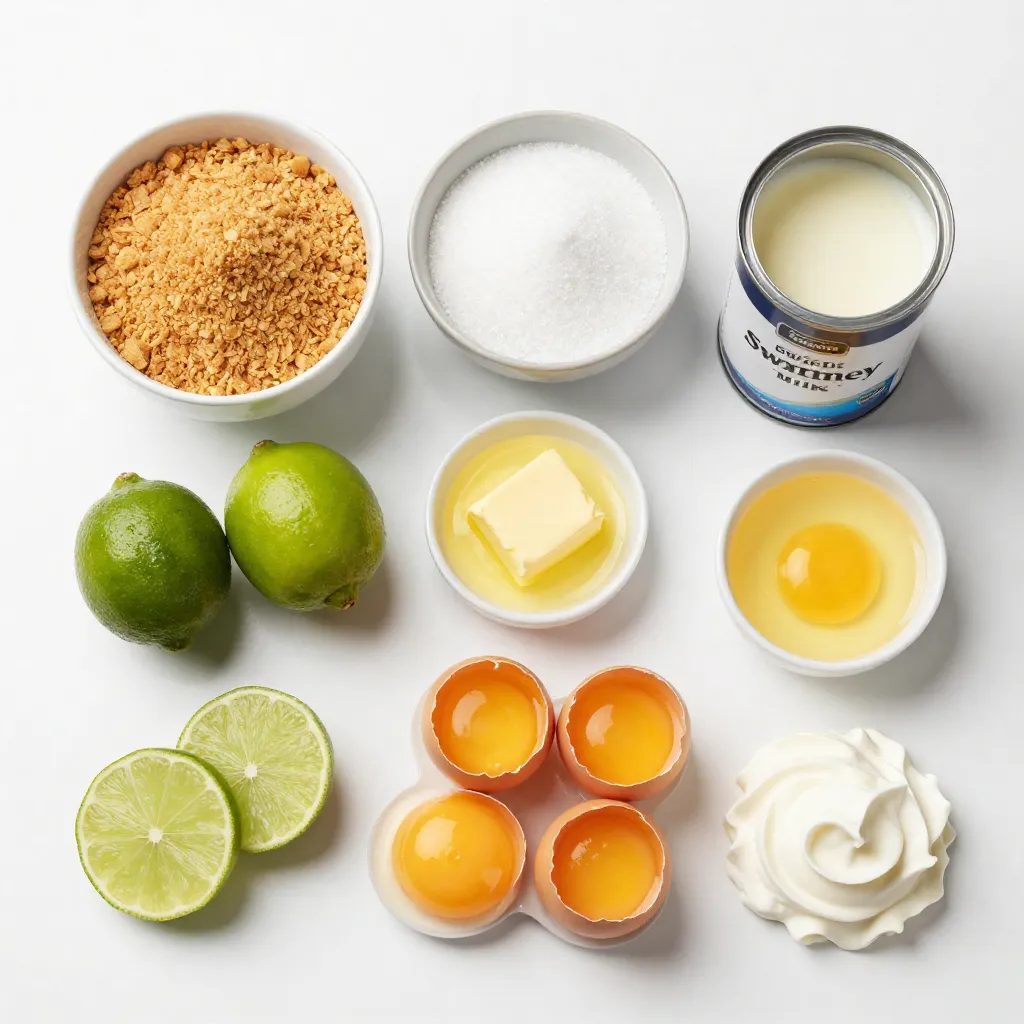
Ingredients
Main Ingredients for Key Lime Pie Bars
– 1 ½ cups graham cracker crumbs
– ⅓ cup granulated sugar
– ⅓ cup unsalted butter, melted
– 2 cups sweetened condensed milk
The base of these bars starts with graham cracker crumbs. They give a crunchy texture. The sugar adds sweetness, while melted butter binds it all together. Sweetened condensed milk provides creaminess and a rich flavor.
Fresh Ingredients
– ½ cup fresh key lime juice
– 1 teaspoon finely grated lime zest
Key lime juice is crucial for that zesty taste. Fresh juice is best for flavor. Lime zest adds a burst of citrus that brightens the bars. Using fresh ingredients makes a big difference.
Optional Toppings
– Whipped cream for topping
– Lime slices for garnish
Whipped cream on top adds a light, creamy finish. Lime slices give a pop of color and a fun touch. These toppings are optional but make the bars look even better.
Step-by-Step Instructions
Preparing the Crust
1. Preheat your oven to 350°F (175°C). Grab a 9×9 inch baking pan. Grease it lightly or line it with parchment paper.
2. In a big mixing bowl, combine 1 ½ cups of graham cracker crumbs and ⅓ cup of granulated sugar.
3. Pour in ⅓ cup of melted unsalted butter. Mix until it looks like wet sand.
4. Press the graham mixture into the bottom of the pan. Make sure it is even and compact.
Baking the Crust
1. Bake the crust for 8-10 minutes. Look for a light golden color.
2. After baking, take it out and let it cool slightly on a wire rack.
Making the Filling
1. In another bowl, whisk together 2 cups of sweetened condensed milk, ½ cup of fresh key lime juice, 3 large egg yolks, and 1 teaspoon of finely grated lime zest.
2. Mix until everything is smooth and well blended.
Final Baking Process
1. Pour the lime filling over your cooled crust. Use a spatula to spread it evenly.
2. Return the pan to the oven and bake for 15-18 minutes. The filling should be set but still slightly jiggly in the center.
Chilling the Bars
1. Let the bars cool at room temperature for a bit.
2. Transfer them to the fridge. Chill for at least 4 hours, or overnight for better taste.
Cutting and Serving
1. Once chilled, cut the bars into squares or rectangles.
2. Serve them on a nice plate. Top with whipped cream and a slice of lime for a pretty touch.
Tips & Tricks
Achieving the Perfect Crust
The crust is key to a great key lime pie bar. You want a crust that is crunchy yet holds together well. To avoid a soggy crust, make sure to bake it until it is lightly golden. This step helps set the texture and keeps it firm. Press the graham cracker crumbs down firmly in the pan. This ensures it binds well and won’t crumble later.
Flavor Enhancements
Using fresh key lime juice makes a big difference. Fresh juice gives a bright, zesty flavor that bottled juice can’t match. If you can’t find key limes, use regular limes as a substitute. You can also add a bit of lime zest to boost the flavor even more. This extra touch enhances the overall taste.
Perfecting the Filling
Watch the baking time closely when making the filling. You want it set but still a bit jiggly in the center. This indicates that it is not overbaked. Overbaking can lead to a dry filling, which is not what we want. So, keep an eye on it during the last few minutes. It’s better to err on the side of caution and take it out a bit early if it looks good.
Pro Tips
- Use Fresh Limes: Freshly squeezed key lime juice provides a more vibrant flavor than bottled juice, enhancing the overall taste of your bars.
- Chill Time Matters: Allowing the bars to chill for at least 4 hours, or preferably overnight, helps the flavors meld and the texture become perfect for slicing.
- Perfect Crust: Make sure to press the graham cracker crust firmly into the pan to prevent it from crumbling when you cut the bars.
- Garnish Creatively: A dollop of whipped cream and a lime slice not only add flavor but also elevate the visual appeal of your dessert for guests.
Variations
Gluten-Free Key Lime Pie Bars
To make gluten-free Key Lime Pie Bars, start with gluten-free graham cracker crumbs. You can find these in many stores or make your own from gluten-free cookies. Use the same amount as the regular crumbs, about 1 ½ cups.
You also want to check your sugar and butter. Most brands are gluten-free, but always read the labels. When baking, keep an eye on the crust. It may need a minute or two more to get that perfect golden color.
Vegan Key Lime Pie Bars
For a vegan version, replace the sweetened condensed milk with coconut cream or a vegan substitute. You also need dairy-free butter instead of unsalted butter.
For the eggs, use flaxseed meal or applesauce as a substitute. Mix 1 tablespoon of flaxseed meal with 2.5 tablespoons of water for each egg. Let it sit until it gets thick, then add it to your filling. This will help your bars set up nicely.
Flavor Variations
Want to switch things up? You can add shredded coconut to the filling for a tropical twist. Just mix in about ½ cup with the other filling ingredients.
Try adding a meringue topping for a fluffy finish. Just whip up some egg whites and sugar until they form stiff peaks. Spread it over the filling before the last few minutes of baking.
You can also infuse the filling with other citrus flavors. Lemon or orange juice can add a bright note. Just replace part of the key lime juice with your chosen citrus for a fun flavor mix.
Storage Info
Proper Storage Techniques
To keep your Key Lime Pie Bars fresh, use an airtight container. Wrap the bars in plastic wrap first, then place them in the container. This keeps them moist and tasty. Avoid stacking them too high to prevent squishing.
How Long They Last
In the refrigerator, these bars last about a week. If you want them to last longer, freeze them. They can stay good in the freezer for up to three months. Just make sure to wrap each bar well to prevent freezer burn.
Reheating Instructions
You don’t need to reheat Key Lime Pie Bars. They taste best cold. If you want to serve them a bit warmer, let them sit out for about 10 minutes before serving. This brings out their zesty flavor nicely.
FAQs
What can I use if I can’t find key limes?
If you can’t find key limes, use regular limes. Regular limes work well in recipes. You can also mix lime juice with a bit of lemon juice for a similar flavor.
Can I make these bars ahead of time?
Yes, you can make these bars ahead of time. Bake the bars and cool them completely. Then, cover them tightly and store them in the fridge. They taste even better after chilling overnight.
How do I know when the filling is done?
The filling is done when it looks set but still jiggles slightly in the middle. It should not be too wobbly. The edges may look firm while the center stays soft.
Are Key Lime Pie Bars gluten-free?
Traditional Key Lime Pie Bars are not gluten-free due to graham crackers. To make them gluten-free, use gluten-free graham crackers. This way, you can enjoy the same great taste without gluten.
Can I freeze Key Lime Pie Bars?
Yes, you can freeze Key Lime Pie Bars. Cut them into squares and place them in a single layer in the freezer. Once frozen, store them in an airtight container. To thaw, leave them in the fridge overnight before serving.
In this post, we explored how to make delicious Key Lime Pie Bars. We covered the key ingredients, step-by-step instructions, and variations to suit your needs. Don’t forget to try fresh lime juice for the best flavor! Keep these tips in mind for perfect results every time. You can enjoy this treat fresh or store it for later. I hope you feel ready to make these tasty bars and impress your friends and family! Enjoy every bit