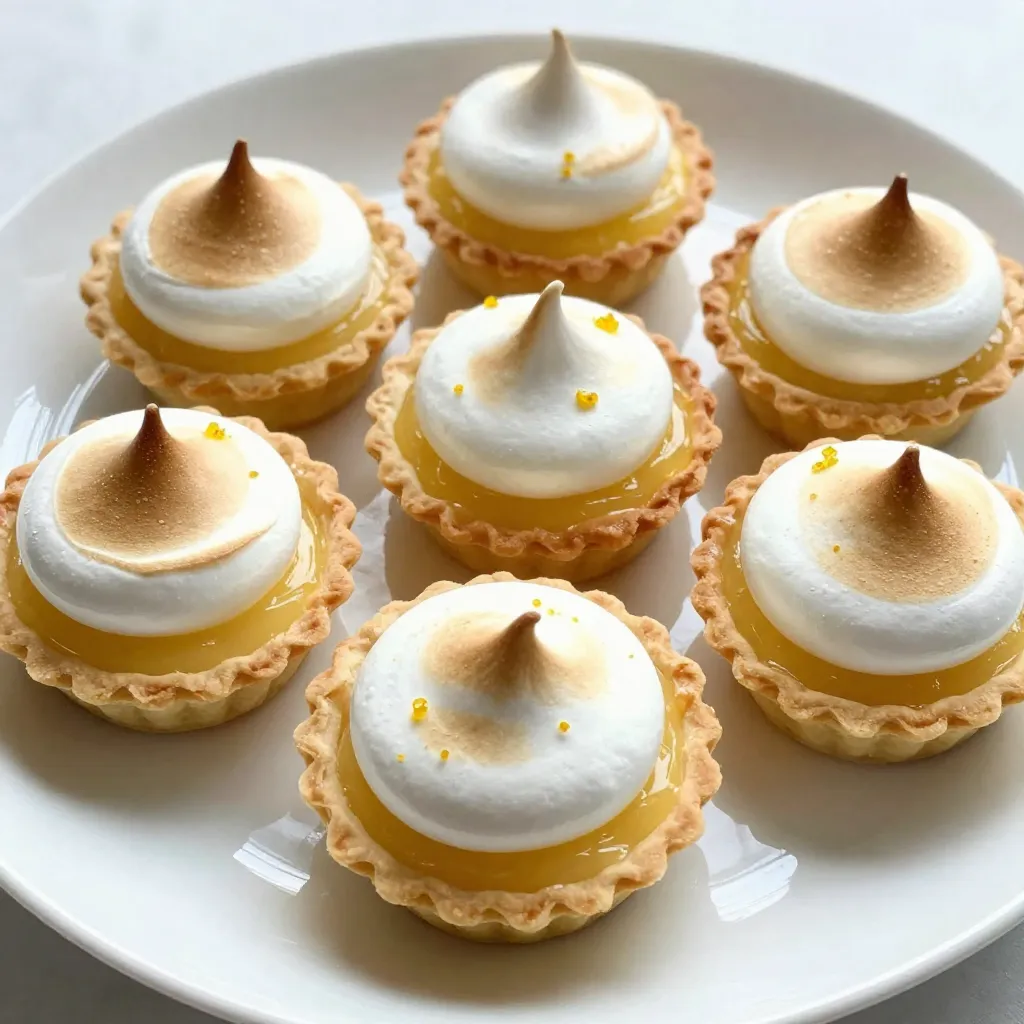
If you love a sweet and tangy treat, mini lemon meringue pies will captivate your taste buds. These bite-sized delights blend crispy crust, zesty filling, and fluffy meringue. I’ll guide you through simple steps to create these amazing desserts at home. Whether you’re baking for a party or just want a quick treat, this is the perfect recipe for you. Let’s dive into the ingredients and make some magic happen!
Why I Love This Recipe
- Bright and Refreshing Flavor: The combination of freshly squeezed lemon juice and zest creates a tangy burst of flavor that is perfect for any occasion.
- Beautiful Presentation: These mini pies are not only delicious but also visually stunning, making them a perfect dessert for gatherings and special events.
- Fun to Make: Crafting these mini pies is a delightful experience, from making the flaky crust to whipping the meringue—everyone can join in on the fun!
- Perfect Portion Size: Mini pies are ideal for satisfying your sweet tooth without feeling overly indulgent, allowing you to enjoy just the right amount.
Ingredients
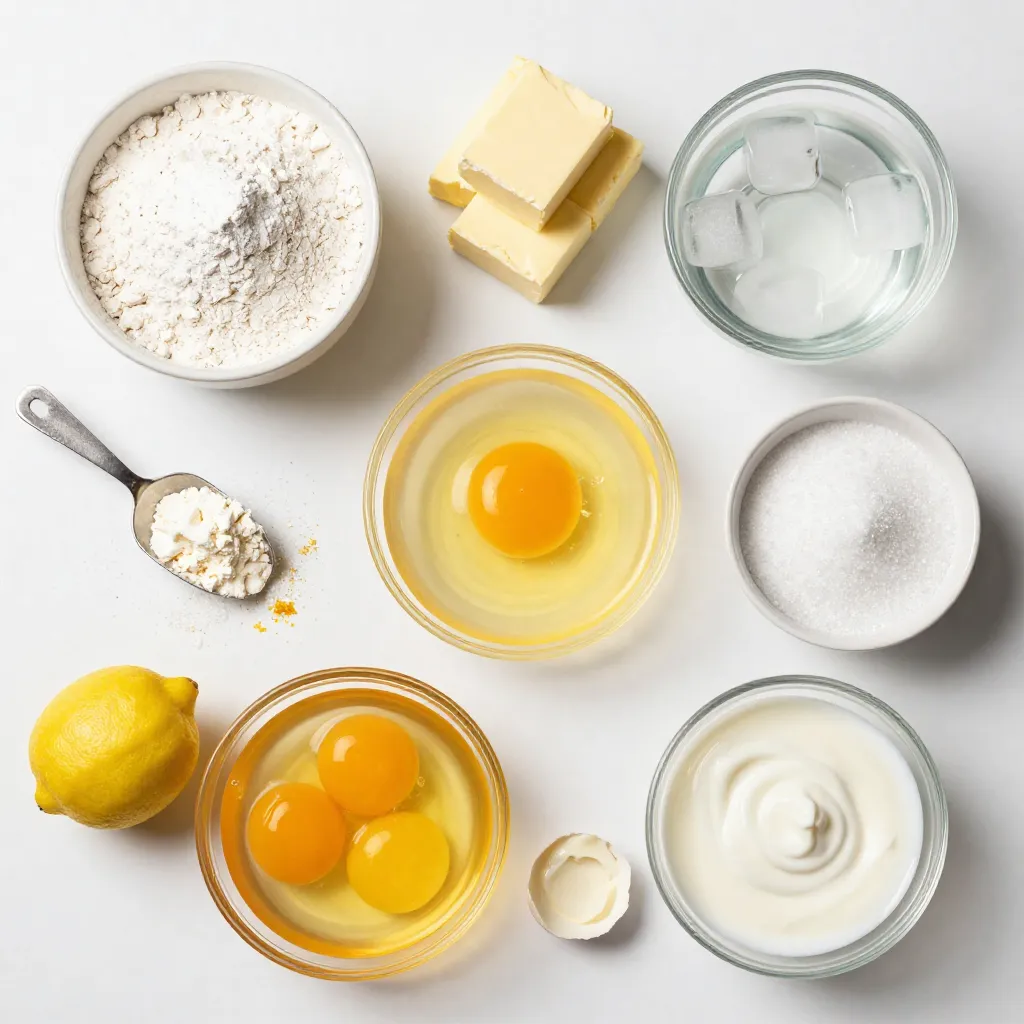
List of Ingredients for Mini Lemon Meringue Pies
– 1 cup all-purpose flour
– 1/4 cup powdered sugar
– 1/2 cup unsalted butter, cold and cubed
– 1 large egg yolk
– 2 tablespoons ice water
– 1 cup granulated sugar
– 1/4 cup cornstarch
– 1/4 teaspoon salt
– 1 1/2 cups water
– 3 large egg yolks (for filling)
– 1/2 cup freshly squeezed lemon juice
– Zest of 2 lemons
– 1 tablespoon unsalted butter (for filling)
– 3 large egg whites
– 1/4 teaspoon cream of tartar
Key Ingredients Explained
The key to great mini lemon meringue pies lies in the balance of flavors and textures.
– All-purpose flour helps form a light crust. It gives the base its structure.
– Powdered sugar sweetens the crust and makes it tender.
– Unsalted butter adds richness and flavor. Make sure it’s cold for a flaky crust.
– Egg yolk binds the crust together, giving it a nice texture.
– Granulated sugar in the filling balances the tartness of lemon juice.
– Cornstarch thickens the lemon filling to a perfect creamy consistency.
– Fresh lemon juice and zest provide that bright and zesty flavor we love.
– Egg whites form the fluffy meringue. They create that stunning topping.
Alternative Ingredients for Dietary Needs
For those with dietary restrictions, you can adapt the recipe.
– Gluten-free flour can replace all-purpose flour in the crust. There are many blends available.
– Dairy-free butter works well if you need a dairy alternative. Look for plant-based options.
– Aquafaba (chickpea water) can replace egg whites in the meringue for a vegan option.
These swaps keep the delicious taste while meeting your dietary needs.
Step-by-Step Instructions
Preparing the Crust
Making the Dough
Start by mixing 1 cup of all-purpose flour and 1/4 cup of powdered sugar in a bowl. Add 1/2 cup of cold, cubed butter. Use your fingertips or a pastry cutter to mix until it looks like coarse crumbs. Next, add 1 large egg yolk and 2 tablespoons of ice water. Mix gently until the dough holds together. Form it into a ball, wrap it in plastic wrap, and chill it for 30 minutes.
Chilling the Dough
Chilling the dough helps it firm up. This step makes it easier to roll out later. While the dough cools, you can prepare for baking the crust.
Baking the Crust
Preheating the Oven
While the dough chills, preheat your oven to 350°F (175°C). This step is key for even baking.
Shaping and Docking the Dough
After chilling, roll the dough out to about 1/8-inch thick on a floured surface. Use a round cookie cutter to cut circles larger than your muffin tin cups. Press each circle into the greased muffin tin tightly. To prevent bubbling, poke holes in the base of each crust with a fork. Bake for 15-20 minutes until they are lightly golden brown. Let them cool completely.
Preparing the Lemon Filling
Mixing and Cooking Techniques
In a medium saucepan, mix 1 cup of granulated sugar, 1/4 cup of cornstarch, and 1/4 teaspoon of salt. Gradually whisk in 1 1/2 cups of water. Heat this mixture over medium heat, stirring continuously until it thickens into a smooth paste.
Tempering Egg Yolks
To temper the yolks, whisk 3 large egg yolks in a separate bowl. Slowly add a small amount of the hot sugar mixture to the egg yolks while whisking. This step prevents them from scrambling. Pour the tempered yolk mixture back into the saucepan and stir well. Add 1/2 cup of freshly squeezed lemon juice, the zest of 2 lemons, and 1 tablespoon of unsalted butter. Stir until melted and well-mixed, then pour the filling into the cooled crusts.
Tips & Tricks
Perfecting the Crust
Avoiding Soggy Bottoms
To keep your crust crispy, dock it with a fork. This means poking small holes in the bottom. These holes let steam escape while baking. Also, bake the crust until it is lightly golden. This helps prevent sogginess.
Achieving the Right Thickness
Roll the dough to about 1/8-inch thick. If it is too thick, the crust may not cook well. Too thin, and it may break easily. Use a round cutter that is slightly larger than your muffin tin. This ensures each piece fits snugly.
Ensuring a Smooth Filling
Important Whisking Techniques
When mixing the filling, whisk constantly. This keeps the egg yolks from cooking too fast. Add hot mixture slowly to the yolks to temper them. This step is key for a smooth texture.
Dealing with Lumps
If lumps form, use a fine mesh strainer. Pour the filling through it to catch any clumps. This ensures your filling is silky and smooth. A smooth filling makes your pies look and taste better.
Meringue Mastery
Achieving Stiff Peaks
Start with clean, dry bowls for the meringue. Beat the egg whites and cream of tartar on medium speed. Gradually add sugar until stiff peaks form. This usually takes about 2-3 minutes. Stiff peaks hold their shape well.
Preventing Weeping Meringue
To avoid weeping, make sure your meringue is thick. Spread it all the way to the edges of the crust. This seals in the filling and keeps moisture out. Bake until the meringue is golden for the best results.
Pro Tips
- Chill Your Ingredients: Ensure your butter and egg yolks are cold for a flakier crust and a stable meringue.
- Perfect Meringue Peaks: Beat your egg whites to soft peaks before gradually adding sugar for a glossy, stable meringue.
- Prevent Soggy Bottoms: Docking the crust with a fork before baking helps prevent bubbling and ensures a crisp texture.
- Cooling Time Matters: Allow the mini pies to cool completely before serving to let the filling set perfectly.
Variations
Flavored Mini Pies
You can change the flavor of mini lemon meringue pies easily. Adding other citrus zests can make them exciting. Try lime or orange zest for a fresh twist. You can also mix different zests for a unique taste. This gives a new depth to the filling.
Another fun idea is to create a chocolate lemon meringue variation. Start with the lemon filling, then add melted dark chocolate. The chocolate blends well with the lemon’s tartness. This combo results in a rich and tangy flavor that many will love.
Dietary Adaptations
If you need gluten-free mini pies, it is simple to adapt. Just swap the all-purpose flour with a gluten-free blend. Make sure the blend works well for baking. This way, you can enjoy the same great taste without the gluten.
For vegan lemon meringue pies, use aquafaba instead of egg whites. Aquafaba is the liquid from canned chickpeas. It whips up nicely and creates a lovely meringue. Substitute the egg yolks with silken tofu or a vegan egg replacer. Use plant-based butter in the filling to keep it vegan-friendly. These changes allow everyone to savor these delightful treats.
Storage Info
How to Store Mini Lemon Meringue Pies
Refrigeration Tips
To keep your mini lemon meringue pies fresh, refrigerate them. Place the pies in an airtight container or cover them with plastic wrap. This helps keep the meringue soft. They will last for 2 to 3 days in the fridge. Be careful not to stack them, as the meringue can get squished.
Freezing Recommendations
You can freeze these pies, but it’s best to freeze them without the meringue. Wrap the cooled pies in plastic wrap, then place them in a freezer bag. They can last up to 3 months in the freezer. When ready to eat, thaw them in the fridge overnight, and then add fresh meringue before serving.
Reheating and Serving Recommendations
Best Methods for Enjoying Leftovers
To enjoy leftover mini lemon meringue pies, I recommend serving them cold. If you prefer them warm, gently heat them in a 300°F oven for about 10 minutes. This warms the crust without melting the meringue. Always check that they do not overheat, as this can ruin the texture. For a fresh touch, add a dollop of whipped cream or a zest of lemon before serving.
FAQs
How long do mini lemon meringue pies last?
Mini lemon meringue pies last about 2-3 days in the fridge. After that, the meringue may start to weep. To keep them fresh, store them in an airtight container. This will help maintain their texture and taste. If you want them to last longer, consider freezing them without meringue.
Can I make the filling ahead of time?
Yes, you can make the lemon filling ahead of time. It stays fresh in the fridge for up to 2 days. To do this, let it cool completely before storing it in a sealed container. When you are ready to assemble the pies, just give the filling a good stir before using it.
What can I do if my meringue doesn’t peak properly?
If your meringue doesn’t peak well, check the egg whites. They need to be at room temperature. If they are cold, they won’t whip up nicely. Make sure your mixing bowl is clean and dry. Adding a pinch of cream of tartar can help stabilize the meringue. If it still doesn’t work, try again with fresh egg whites.
Can I use store-bought crusts instead?
Absolutely! Using store-bought crusts can save you time. Just make sure they are the right size for your muffin tin. Follow the baking instructions on the package. This option works well if you want to focus on the lemon filling and meringue. Enjoy the ease of making these delightful pies!
Mini lemon meringue pies are a delightful treat you can master at home. We covered ingredients, step-by-step instructions, and helpful tips. Don’t forget variations for different tastes and dietary needs.
With proper storage, you can enjoy them longer. Remember, practice makes perfect. Don’t let set backs discourage you. Each bite brings joy, and you will shine as a baker. Enjoy the delicious journe